http://youtu.be/-pRVpHIzjLA
Hello and welcome to this video on the GIMP. Now in this video, I’m gonna show you how you can prepare your images that have this white background for EBook covers, or software box E-covers, and so on. Or for that matter, let’s say we’ve got a picture from a wedding for example that has something or someone in the picture that you don’t want in the picture. You can do the same technique to remove that particular item or individual from that picture. For example, in this case we’ve got a software box E-Cover here and this just would not look like the same if it had this white background in there. It looks kinda dorky, actually. So in this video I’m gonna show you how you can effectively remove this white background and let me show you what the end-result would look like. It would look like this. Now some folks call this rendering, some folks call it transparency, I call it removing the white background. So whatever you want to call it, hopefully this will be the end-result. Since this can be rather intricate and a little time-consuming, I can explain this the same technique in detail by showing you something a little bit easier to deal with. Let me get rid of these guys here. Get rid of this box here.

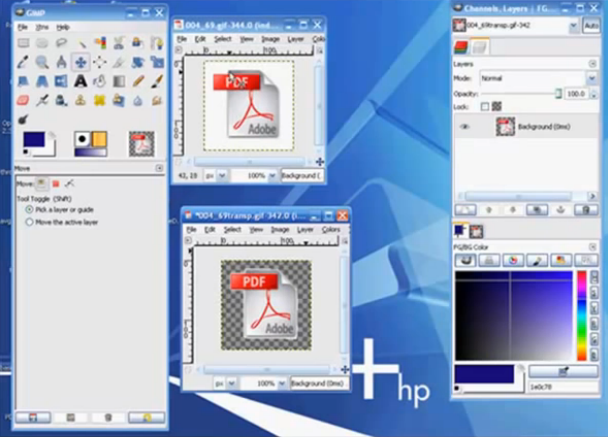
And we’ve got this icon for Adobe PDF and we have this icon for Adobe PDF transparency. I’m gonna use this as example because, well, frankly there’s square lines. Whereas with the people, you’ve got the head, you’ve got the hair, you’ve got the fingers, you’ve got the dollar bills, and so on. And again, the same technique can be used just with this one it won’t take so long whereas with the other one you wanna take your time. So let’s get right into this. Now first off we’ve got our image here. Let me open up something that might resemble a header. Say if it were about 700 pixels wide, 150 in height, and go to Advanced Options. We want a white background. We’re gonna change it out here in a second to blue. Now over here we’ve got our Layers Dialog box and that’s this guy right here.

So now what we wanna do is we want to put this guy here right in here. I’m gonna hold my control button down and then click on the C to copy this on my clipboard. I wanna create a new layer here by clicking on this and let’s make this 150 by 150 which is about the same size as the adobe icon and turn in my clipboard so I should just be able to paste. There we are. Again this is why we do not want this white background. We want this to blend in naturally with the blue background. So let’s get rid of this. Actually, let’s not get rid of it. It’s floating around up here so let’s go and anchor this to the new layer we already created by right-clicking, “Anchor Layer”, and just close the eyeball so it will go bye-bye. Let’s go ahead and get this guy down here and get our work space up here.

Now then, right now we are at a hundred percent so to make this easier for us to see the details in the lines here, in the outline because what we wanna do is we’re gonna cut this white background out. We’re gonna toss the trash so it’s not there anymore. Let’s bring this a little bit larger than life so that way you can see most of the pixels and we can go to 800 to see even more. And this is what you would wanna do when you’re dealing with the details such as somebody’s strands of hair, or their fingers, or like with that image of the two people holding the dollar bills. You wanna go to the 800 pixels. The larger you can get, the better. The more detailed you’re gonna be able to get. But for the sake of this video, we’re gonna go with four. And now then we want the Paths Tool, click on that. We wanna be in Design mode and let’s go and start with the top here just for the sake of argument. And the more details that you got to deal with use less space between your clicking. What I’m doing here is I’m just clicking my left mouse button to connect the dots. Since I am dealing mostly with straight lines here, oh and if you screw up something like this here or like that, control button on your keyboard, letter Z and just keep it the letter Z until you get back up a good spot.

Let’s get this down here and just continue on down the line and you can probably see now why I chose this particular item for this video because again it’s mostly straight lines and you don’t want to spend all day watching me do this. And you’ll see that this here is gonna show up here in a second. That’s a mistake and you just wanna go back and correct that because you can’t just go over here and hold your mouse and squeeze it in. You just hit your control + Z button and go back until it’s at a good spot and then do it over again. Hopefully that’s making sense to you. Now you wanna connect this. You wanna complete your outline here and to do that hold your control button down and you’ll see where you’ve got the two circles. Right there you got the circle with the line through it.

Now we’ve got the two circles interconnecting and it looks like an infinity symbol, then click your left mouse button and you are connected. Now then since we are now connected, what we’re gonna do next is we want to go over here to our layers and then right-click and we want to go all the way down to “Add Alpha Channel”. And once we’ve added the alpha channel to this, we come over here in our dialog box and click on “Selection from Path” and that will get our little ants marching. And what that does that’s selected because it’s a selection tool. Our Paths Tool, it’s basically a selection tool. It selected our image we’re going to maintain. Now what we wanna do is we want to invert this so we can get the marching ants going around the outside of what we wanna get rid of. And to do that we want to invert this and we can do that a couple of ways. Go to Select > Invert, or we can also hit the control button on our keyboard and the letter I, as in invert. So now we’ve got that inverted. We click on the delete key. And there you have it folks!

All these little checkers here that tells you that this is basically no background. I mean it’s what they call transparency. And you can kinda see where we could have made a little bit better lines here because it will show up here when we put this up against that dark blue background. And again if it weren’t for the video, you’d wanna spend a little more time with this. Be a little more perfection. And again if these were brought up to an 800 pixels size then you’d be able to see those details so those pixelated boxes will be a lot bigger and you could be a little more extra detailed and the end-result would reflect that. So let’s go ahead and get this back down to a hundred percent. Get our little windows shorten up here a tad. Now at this point you wanna save this. You can do that just by going to File > Save As > and give it a name right here and I’m gonna say Transparency. And then come on down here and click on Save.

Now if you wanted to save it that’s something other than a .GIF, then you come on down here to “Select File Type (By Extension)” and there’s a bulk load of options down here. For the time-being, hit this minus button, bring this character back up here, hit the Save, and then this comes up as a .GIF option, click Save, that’s cool. What we wanna do now is we want to unselect this. Go to Select > click on None > and let us go ahead and move this guy into here. And what I can do here now go up here to the move tool and with this being highlighted or actually you can see here in the Layers box that this is a character that I’m working with right now and in the image box here versus this. So right now I’m working on this one. I’m gonna copy this to my clipboard. Control button on the keyboard and then click on the letter C, as in Copy. It’s in my clipboard now. Let’s bring this guy up here, get us another new layer similar to the other that we had here. Here’s our new layer here. Just kinda click on that so it’s highlighted and then click over here. Right-click V, as in Victor. And this is guy is floating so let’s anchor. Right-click > left-click on anchor, and now this is our.

This is what it used to look like with the white background and this is what it looks like now. Of course, it’s still kinda yucky with the imperfections there but you get the idea. And you can just click this down, move it around. And with the Scale Tool you can make it smaller. So that’s how you can remove the white background or any type of background from your image in so far as the E-Book or DVD E-Covers are created. This is how you could use your images to make them pop a little bit more. Make your images look a little bit nicer on those covers. So I hope you learned something from this and have a great day!
***To download the PDF of this tutorial Click Here.